Last Friday afternoon I sat at my kitchen table and watched my fifth grader, who had stayed home sick from school that day, respond to a written assignment from his teacher with little to no regard for conventions. I prompted him, as I’ve done so many kids over the years, to take a second look and correct his errors, but his efforts and my expectations were definitely not in alignment. Like so many kids, my son is quick to generate ideas–usually good ones–and put them on paper, but is unwilling (or unable) to return to his writing to edit.
There are many factors that may contribute to this. In the early years of my career, I expected kids to simply know how to use an editing checklist when I put one into their hands, not knowing how much scaffolding and explicit teaching I would need to provide. Some students, in spite of my best efforts, were unable to see the value of using a checklist to grow as a writer and make their work presentable to an audience. Others lacked a solid understanding of the writing process, confused about what it means to edit in comparison to the work of revision.
All of these types of writers fall into the category of “Reluctant Editor,” a writer who will not (or cannot) engage in the work of editing independently. When kids show up in our classrooms at all stages and abilities of writing development, maybe it’s a good time to step back and ask what isn’t working: Is it the writers, or is it the process?
It’s most likely a little bit of both if I’m being honest. Providing solid, explicit grammar instruction will support writers in learning and internalizing conventions for accuracy. But what about the editing process? Even students who have mastered grammatical concepts will make mistakes and need to have the skills to correct them. Here are a few simple strategies that may help you–and your students–embrace the writer’s checklist with more patience and deeper application.
Strategy #1: The Manipulative Checklist
Editing checklists may come in many fonts and colors and sizes, but they usually only show up in one format: linear lists of items for students to check off one by one as they attempt to improve the conventions of their writing. The problem? The boxes are easy to check, but the work is not always easy to do.
Enter the manipulative checklist. A manipulative checklist can take many forms, but the big idea is simple: take each task on your editing checklist and make it into its own individual task card. In the classrooms in which I’ve worked, I usually introduce items one-by-one from the beginning of the year, growing the expectations as the kids grow their editing skills.
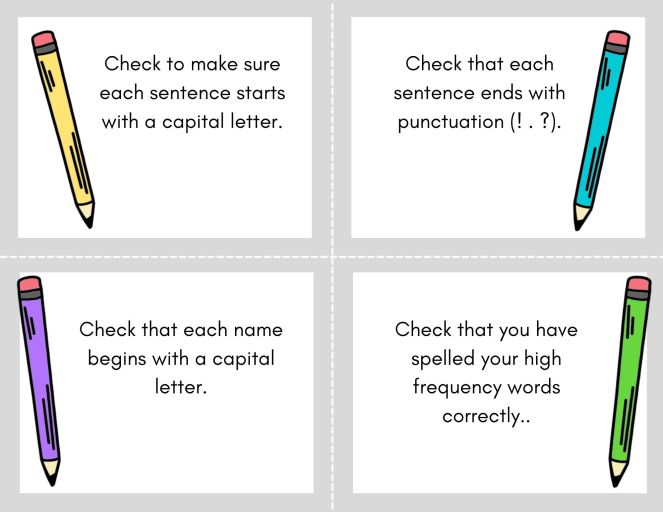
When using the checklists, students typically have two envelopes or small plastic bags, one labeled “Need to Do” and one labeled “Done.” Kids pull items out one at a time from the “Need to Do” bag, engage in editing with that specific lens, and move the task over to the “Done” pile before selecting another.
The Pros:
- Writers only have to focus on one item at a time.
- Lists can be differentiated. Some students may be ready to be accountable for adding quotation marks to dialogue in their writing, while others are still striving to master ending punctuation. With this method, everyone has a “just right” set of tasks to work on when editing.
- Tasks can be removed when mastered. Often, editing checklists ask students to work on a broad range of skills without ever acknowledging when a student has a specific skill under control. With manipulative checklists, students can just as easily remove cards for skills they do automatically (for example, capitalizing the first word of a sentence) as they add new skills.
Strategy #2: Edit By Color

If your approach to editing is to engage students in a few general, straightforward steps to checking conventions, editing by color might be the strategy for you. This approach, recommended by Ralph Fletcher in his 2010 book How Writers Work: Finding a Process That Works for You, invites writers to go through the editing process in a step-by-step manner using a different color for each task. He invites young writers to pick up a green pen, for example, to read through their entire writing piece for capital letters in the correct places. A red pen is for punctuation, blue for spelling, and orange for spacing and paragraphing.
In my own classroom, I used to create “editing toolkits” for students that were equipped with writing utensils of each color and a label on the front to remind them of the purpose for each pen.
The Pros:
- Writers focus on one item at a time.
- Since each color has a broad focus–punctuation, spelling, capitalization, etc.–depth can be added over time as new skills are learned (for example, capitalization may begin with the first word of sentences and names and grow to months and days of the week as new skills are introduced).
- It is easy to visually look at a student’s writing to see which conventions they are addressing and which they are not.
Strategy #3: The Editing Minute
In December of 2019, my fellow TWT writer Beth Moore introduced an idea I’ve absolutely fallen in love with: the Editing Minute. If you haven’t read her post yet, you must–but to quickly recap, the Editing Minute involves simply stopping each of your workshop sessions a minute early to give kids the time, space, and reminders to engage in ongoing editing on a daily basis.
Sometimes this approach may be very open-ended by just opening up a minute for kids to do nothing but reread their writing to look for places to edit.
Other times you may build in some controlled choices or scaffolding by inviting kids to focus on only one aspect of editing (“Reread your writing with an editing pen in hand to look for places where you may have missed punctuation!”) or may give students two or three choices of what to focus on (“Pick one thing to edit for the next minute: spelling, punctuation, or capital letters.”).
With any of these approaches, one thing I have found particularly effective with the Editing Minute is to give students an additional minute to talk about their editing with a partner after they have engaged in the work. Not only does this build in accountability, but both writers benefit from hearing about the work the other writer has done.
The Pros:
- There are lots of opportunities to vary how you implement this in your classroom.
- The Editing Minute shifts writing from being the linear process of Plan-Draft-Revise-Edit-Publish to the more realistic process of ongoing improvement.
- Editing is done on work that is fresh and new, not work that was done a few–or several–days ago.
- Little, if any, special checklists or materials are needed for this work. Clear and concise anchor charts can serve as visual reminders without requiring students to check boxes or cross items off a list.
No matter how we approach it, the work of editing isn’t an easy task. While this is particularly true for our developing writers, it is also true all writers will grow with the right supports in place. In shifting away from the traditional checklist to options that are more flexible, timely, and visual, you will hopefully begin to see the dreaded task of editing move to a more valued–and less avoidable–part of the writing process.
Discover more from TWO WRITING TEACHERS
Subscribe to get the latest posts sent to your email.


This article is just what I need! Excellent material, Sarah, thank you very much.
LikeLike
Such a smart post, Sarah! I really like the manipulative checklist (is that really it’s name?!) and the idea of little envelopes for “to do” and “done”. I think this could work well for differentiation and the different editing goals students might have. Thanks for a great idea!
LikeLike
Thanks, Kathleen! I don’t think that’s its “real” name, but I couldn’t think of anything more fitting!
LikeLike
“The boxes are easy to check, but the work is not always easy to do.” Isn’t that the truth!??!
Love this post, Sarah! It’s always the right time to find ways to make editing more accessible to kids!
LikeLike