A few years ago, my daughter came home with a bag full of work from school. Among the math sheets, old name tags, and pencil shavings was her writing workshop folder. I (of course) was curious to see what was in it and the kind of work she had been doing with her folder.
I opened the folder expecting writing workshop stuff – lined notebook paper, or lists of ideas to write about. There was all that — plus there were pages of doodles. I instantly jumped to the conclusion that my daughter hadn’t been paying attention during class, or was wasting writing time.
Later, she told me that her doodles help her get ideas, and that she was allowed to doodle as long as it didn’t get in the way and was helping her. I realized that I, like many teachers, had jumped to the wrong conclusion about doodling.
It’s been a few years since then (she’s in seventh grade now), and I personally have done a lot more doodling and drawing in my writing, which opened my eyes to the power of drawing at every stage of the writing process.
GENERATING IDEAS
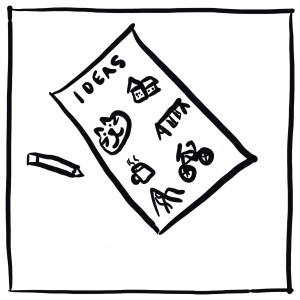
When students are stuck for ideas, writing lists can be helpful – lists of people they spend time with, lists of places that are important to them, first times, last times, best times, and worst times. But for some students the ideas will come more easily if they sketch, draw, or doodle. Drawing can slow you down in a way that is useful for generating ideas and thinking more deeply. Try it—then come back and read further.
PLANNING & DRAFTING
Many teachers default to a standard graphic organizer when students are planning. Character/Setting/Problem/Solution. Or the old five paragraph essay “hamburger.” The problem with these organizers is twofold. 1) They are too formulaic and do not improve the final result – in fact the constraints of organizers like these often lead to worse writing. 2) Even when the organizer is okay, many students simply fill out the organizer as an assignment and then don’t use it as they draft.
There are solutions to this problem! One solution is to teach students a way to plan that puts the plan on the page where they will do the writing.
In younger grades you can provide paper with a space for drawing, and a space for writing. In older grades students can use a post-it to plan what will go on each page when they are ready to write. This organizer is much more concrete, while also not being formulaic.
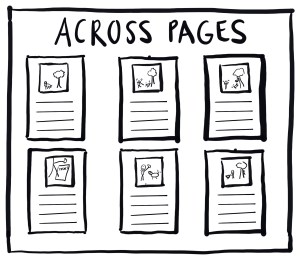
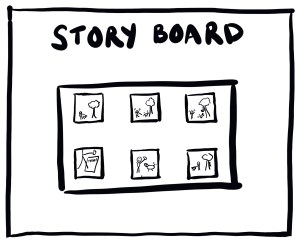
If transferring a plan to the draft is not a problem, you might find storyboarding a useful strategy for planning, for students who benefit from visual support, or find writing to be laborious. A storyboard is also much less formulaic than other organizers and leaves a lot more room for students’ own thinking.
Lastly, there is another solution to the graphic organizer problem. Let students just write if they want to. Not everybody works the same way. Some kids will produce a perfectly fine draft if you let them just write, using the plan they have in their mind. You will never know if you don’t give them a few options.
REVISING

Revision can be tough for kids (and adults too). It’s human nature to feel “done” at the end of something. Changing what they’ve already written is a challenge for a lot of students, and it can be hard for them to understand the point of it.
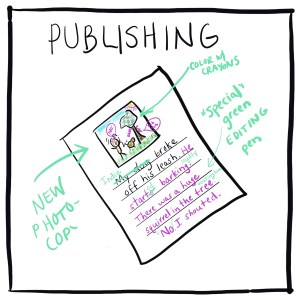
One tip I have is to photocopy their original and give them a photocopy to work on. This is a game changer, I promise. When kids know that their original is safe and sound, they are usually more willing to mark up and cut up their work. It also helps to consistently and constantly compliment the marking up and “messiness” of revision, and model it in your own writing.
Another tip is to use a different color pen for revisions so that you and your students can really see the work they’ve done. I like to call it Magic Revision Pen for younger students (and sometimes older ones too).
At this stage, if students haven’t already used drawing to help them, on option you might offer them is to add a post-it or add a flap of paper to their work to sketch a picture that goes along with their writing. As they sketch, ideas might come to them. Again, drawing slows you down and gives you the opportunity to think as you go.
If students already did some sketching or drawing, they can add to the drawing to get new ideas for what to add to the writing.
“PUBLISHING”
Most of the time, when student’s publish for writing workshop, I think of it as “publishing,” with quotation marks around it.
When kids publish, it is important to remember that it is not the same as when adults publish. Adults send a messy manuscript to a professional editor who does all the copyediting for them, and then it gets worked on by professional graphic designers who layout the pages, and then published in a way that is marketable. That is not the process for kids.
We can make the publishing process very similar, having kids do their own copy editing, for example, and having a partner read it together with them, much the way an editor might.
Kids can make edits the way a professional editor would, in a different color, and with editing markings like carets (the tiny arrows that show you want to add something).
Kid can even “fancy up” their work by adding color or a new illustration to the work.
However, if they’ve been writing by hand, most students will not need to rewrite, type up, or copy their work beyond this point. To do so can be grueling, and many kids will simply make new errors during the copying.
For me, a good guideline for whether or not to copy over the work has two parts 1) If kids want to copy it over—AND 2) it won’t take longer than one writing workshop, meaning they are fluent as writers and it likely won’t be a frustrating experience. This could be as young as second or third grade, or might not happen until well into middle school. Some kids in your class might copy, and some might not.
If students have been typing all along, it’s really helpful at this stage to print it out and work from hard copies so that kids can use the strategies of marking up the same way an adult editor would, and can add pictures that might lead to new ideas.
CELEBRATING
Writers know that their work is never really “done.” However, once students have revised and editing their work, it’s time to wrap it up with a publishing celebration.
Their work deserves to be celebrated as is, with all the markings, cross-outs, and additions or cuts they’ve made. I recommend that the celebration is not focused on a beautiful product—instead it’s focused on the hard work and the process of creating a piece of writing. If the work is copied over and perfect, nobody can see the strategies that were used to get there.
If students do copy over their work or create a “perfect” looking final piece, I like to display and celebrate the before and after of their work by displaying all the drafts together or side-by-side.
Lastly, you can celebrate the way you’ve taught the unit, by giving kids lots of choices at each stage of the process, knowing that every student has their own way of doing things when it comes to writing.
Discover more from TWO WRITING TEACHERS
Subscribe to get the latest posts sent to your email.


Admittedly, I never did enough with drawing in the classroom — mostly because I am terrible at it — when I was teaching. Alas, I learned some basics from Kristi Mraz several years ago and have slightly improved my abilities. As a result of my somewhat boosted confidence, I am able to help kids draw more often/see the value in drawing. It is such a powerful tool — at any age!
LikeLike