 A few years ago, Beth Moore helped me realize we can teach our own children how to master skills by using the minilesson architecture. There have been countless times I’ve taught Isabelle, who is now 6 1/2, how to do something by engaging her in a minilesson.
A couple of weeks ago, my husband and I found ourselves busy with dinner preparation when Ari, our 10-month-old son, let it be known he was hungry. Knowing Isabelle had expressed interest in feeding Ari, I asked if she’d be willing to feed him while my husband and I prepared dinner. She agreed.
Seeing as Isabelle had never fed Ari before, I needed to teach her how to feed him safely. First, I connected to her prior knowledge, since she had seen us feed Ari many times before. Next, I delivered my teaching point (the what+the how+the why). Afterward, I demonstrated by giving Ari a few bites of food while she watched. I explained the things I did (e.g., putting a small amount of food on the spoon, wiping his mouth) while showing her what it looked like. Next, I allowed Isabelle to practice feeding Ari while I observed. I gave her a lean prompt when I noticed she needed help holding the spoon steady and using the spoon to catch runaway food). Finally, I reminded her that anytime she wanted to feed her brother, she could do x, y, & z to feed him safely.

Minilesson planning for writing workshop isn’t complicated when you know what you want to teach, how to teach it, and why it matters to kids. Once you have the architecture of a minilesson and some scaffolding language in your repertoire you’ll feel confident to plan instruction for the young writers you teach.
What are minilessons?
Minilessons are a time to gather the whole class in the meeting area to raise a concern, explore an issue, model a technique, or reinforce a strategy (Calkins, 1994, 193). In addition, minilessons are also times that can teach students procedures for how to do something in the writing workshop (Ibid., 194). Typically, minilessons are ten minutes long and provide an opportunity to teach students something while giving them some time to practice what’s been taught before the independent writing portion of writing workshop.
How do I decide what to teach in a minilesson?
Mini-lessons come from many places. Many people use local or national standards to help them decide what to teach to students. Other people use the scope and sequence provided by a district-purchased curriculum, such as the Teachers College Reading and Writing Project’s Units of Study, to help them determine which minilessons to teach. Minilessons also come from what you’re noticing in your classroom with your students. For instance, you might notice you’re delivering the same teaching point in a conference several times. If that’s the case, it’s time to turn that teaching point into a whole-class minilesson. You might also read your students’ in-progress writing and notice commonalities. If you do, then you can teach into that with a whole class minilesson. Basically, just by being a responsive teacher you’ll find things to teach your students during the whole-class instructional time.
What’s the architecture of a minilesson?
There’s a basic architecture — connection, teaching, active engagement, and a link — of a minilesson. Using a predictable format helps students know how a minilesson goes since it’s the same structure day after day. (Though, as Melanie stated yesterday, inquiry-based minilessons will have a different feel.) This architecture allows you to activate students’ prior knowledge, teach them something, give students a chance to try it, and then connect what you’ve taught to the work they’re doing as writers.
The four parts of a minilesson are:
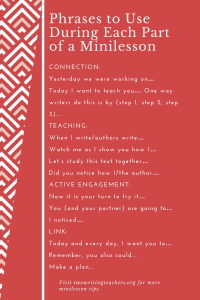
CONNECTION: Invite students into the learning by activating the prior knowledge. In this portion of the minilesson, you’ll explain the relevance of what you’re teaching so students will understand the importance of the lesson. You might connect the day’s minilesson to something you taught the previous day, earlier in the unit of study, something students did in another unit of study, or to something in real life. Be sure to deliver a concise teaching point at the end of the connection so students know exactly what to expect during the rest of the minilesson. Many teachers list their recent teaching points on an anchor chart that’s displayed in the meeting area.
Phrases to use in the Connection include:
- Yesterday/last week/remember when we were working on…
- Today I want to teach you… One way writers do this is by (step 1, step 2, step 3)…
TEACHING: This is the heart of your minilesson since this is where you’ll not only explain the teaching point in greater detail, but you’ll show your students how it is you go about doing whatever it is you’re teaching them. You’ll demonstrate the teaching point by using a piece of your writing, student writing, or a published mentor text. After your demonstration, debrief what you taught students by saying something like, “Did you notice how I…?” Then, repeat the teaching point you delivered in the connection at the end of the debrief of your demonstration.
Phrases to help you frame the Teaching include:
- When I write…
- Watch me as I show you how I… (set up demonstration)
- Did you notice how I…
- When authors write…
- Let’s study this text together… (set up demonstration)
- Did you notice how the author…
ACTIVE ENGAGEMENT: You will then pass the baton to the students offering them a chance to try out the strategy you taught. Make sure whatever it is you’re asking your students to do matches whatever it is you just taught students to do in the demonstration. Students might try out what you taught by using their own writing or a sample piece of writing. Students could also turn and talk with their writing partner about how they could use the strategy in their writing. Regardless of how students are actively engaged, it’s important for you to walk around to different parts of the meeting area to assess students understanding of your teaching. After a couple of minutes, gather the class back together and talk about what you noticed as you walked around the meeting area reading students’ writing or listening into students’ conversations.
Phrases to help you set up the active engagement and debrief it:
- Now it is your turn to try it…
- You (and your partner) are going to…
- I noticed…
LINK: During the link, you should also repeat your teaching point a final time — using the same phrasing as you did in the connection and at the end of the teaching demonstration — so you reinforce whatever you taught your students to do. The link is an opportunity to make sure students understand the strategy you’ve taught them isn’t taught in isolation. Rather, it’s a strategy they should add to their repertoire of writing strategies. Make sure to explain to students how this is a strategy they can use not just today, but any time they’re doing this same kind of writing. Sometimes your students won’t go off and immediately tackle the strategy you taught in the minilesson since it doesn’t apply to the work they’re presently working doing as writers. You might reference the anchor chart that contains your recent teaching points to remind students of their previous learning so they can make their own choice of what to do during their independent writing time.
Phrases to use in the link:
- Today and everyday, I want you to…
- Remember, you also could…
- Make a plan…
Is there specific language I should use during each part of the minilesson?
Many teachers find it helpful to use certain phrases during each part of the minilesson, regardless of their teaching point. I’ve embedded the phrases in each section (above) and have created a chart you can keep alongside you as you’re planning. Using these phrases keeps the minilesson flowing and also helps students know what to expect.
- Repeat yourself! Repeat your teaching point, using the same language, at least three times during your minilesson: at the end of the connection, during the teaching, and in the link.
- Matchy-matchy is good! That is, make sure your demonstration matches your teaching point. Also, make sure the active engagement matches your teaching demonstration.
- Demonstrate! When you set up the demonstration, make sure students know what they’re about to watch, what they should be looking for, and/or what they should do.
- Time yourself! It’s important to keep minilessons concise so you don’t encroach on students’ independent writing time. Use a stopwatch (not an alarm) to help you keep an eye on the time. If you find your minilessons going long, figure out what part of the minilesson is taking up too much time so you can reign yourself in going forward.
- Struggle a bit! Students need to see that writing isn’t always easy. During the teaching portion of the minilesson, you might play act a bit and think aloud by saying things like, “Hmmm…. How could I do this?… Oh, I know!” or “I’m not sure. What do you think?” (and then quickly solicit one or two student opinions). When students see their teacher struggle a bit, it helps them realize their struggles are legitimate.
Next Steps
When you’re ready, you can use the minilesson architecture to help you with more than a simple demonstration minilesson. You might try out a guided practice (i.e., teacher coaches the students through the strategy using lean prompts) or explanation with example (i.e., teacher provides students with an example of the strategy and provides an explanation with how to carry out that strategy in their own writing) minilesson. You can also try out an inquiry minilesson (i.e., teacher invites students to study with her, which enables the students to discover something new, name what they’re noticing, and transfer it to their own writing). However, be aware that an inquiry lesson will likely run a bit longer than ten minutes.
Melanie Meehan created a useful template you may download to help you with your planning.
Minilesson Planning Sheet – Created by Melanie Meehan
Link Roundup
- A Short and Sweet Minilesson Formula
- How to Plan a Minilesson from Scratch
- Instant Minilesson Follow-up
- Quick Tips for Writing Teaching Points
- Showing Not Telling: Demonstrations Matter
- There Are More Ways Than One to Teach a Minilesson
- Top Ten Ways to Keep Minilessons from Turning into Maxilessons
Suggested Reading
- Day by Day: Refining Writing Workshop Through 180 Days of Reflective Practice by Ruth Ayres and Stacey Shubitz
- DIY Literacy: Teaching Tools for Differentiation, Rigor, and Independence by Kate Roberts and Maggie Beattie Roberts
- The Art of Teaching Writing, New Edition by Lucy Calkins
- The Writing Strategies Book: Your Everything Guide to Developing Skilled Writers by Jennifer Serravallo
 Giveaway Information
- This giveaway is for a copy of Renew! Become a Better — and More Authentic — Writing Teacher. Many thanks to Stenhouse Publishers for donating a copy for one reader. (If the winner has a U.S. address, you may choose a paper or eBook. If the winner has an international mailing address, then you will receive an eBook.)
- For a chance to win this copy of Renew! Become a Better — and More Authentic — Writing Teacher, please leave a comment about this or any blog post in this blog series by Monday, August 7th at 5:00 p.m. EDT. Beth Moore will use a random number generator to pick the winner’s commenter number. His/her name will be announced in the ICYMI blog post for this series on Tuesday, August 8th.
- Please be sure to leave a valid e-mail address when you post your comment, so Beth can contact you to obtain your mailing address if you win. From there, our contact at Stenhouse will ship your book out to you. (NOTE: Your e-mail address will not be published online if you leave it in the e-mail field only.)
- If you are the winner of the book, Beth will email you with the subject line of TWO WRITING TEACHERS – RENEW BOOK. Please respond to her e-mail with your mailing address within five days of receipt. Unfortunately, a new winner will be chosen if a response isn’t received within five days of the giveaway announcement.


Balanced Literacy is crucial for struggling learners to succeed. Mini lessons are the “BUZZ” for igniting our students today.
LikeLike
Thank you so much! “The Phrases to Use During Writing Workshop” is not enlarging for me. I am collecting all these posts on Writing Workshop. This will be my 41st year of teaching. Still learning! D 🙂
LikeLike
Here’s the direct link to the phrases chart I created on Canva: https://www.canva.com/design/DACcMFoNg2k/zU9Mb-2hO4dbl2mtqbN4hg/view?utm_content=DACcMFoNg2k&utm_campaign=designshare&utm_medium=link&utm_source=sharebutton. Hopefully that will help you see it clearly.
LikeLike
Your example of a real life mini-lesson brought me back to may parenting days and I realized that I ‘mini-lessoned’ my kids without even realizing it 🙂 Back then the concept of a mini-lesson didn’t even exist. Just another indication of the organic yet thoughtful nature of this model of teaching.
LikeLike
I watched a demonstration of the “struggle a bit” modeling last week from a presenter. It was so powerful to see this modeled. Students need to see the hard work that goes into crafting each and every sentence! Thank you for the wonderful review of steps needed to be effective in teaching.
LikeLike
The “Struggle a Bit” tip is so important. As adult writers it’s easy to forget the struggles our young writers face.
LikeLike
As I told you I love the “Matchy- Match” part under the Quick Tips! So important to always deepen our understanding. Such a pleasure to be sharing our learning this week at TC!
LikeLike
Love this! I can’t wait to share this post in my book club this Wednesday!
LikeLike
Thank you so much for the great explanations of each part. I will share this post with the writing teachers I support!
LikeLike
It reminds me of Madeline Hunter ( showing my age). Giving our students the opportunity to grow their skills with confidence! Love the structure of the minilesson.
LikeLike
This week’s articles are SO helpful!! Thank you SO much! I have 13 new teachers to work with and this series is a great resource! kburris@orinda.k12.ca.us
LikeLike
Thank you for the suggested reading list!
LikeLike
Thank you for sharing the mini lesson information, it is greatly appreciated! 🙂
LikeLike
Review. Refresh. Renew! Enjoy the remaining days of August! Looking forward to a new group of 7th graders. Thanks for all your tips! Hosting a student teacher this year, your book giveaway would be fabulous for both of us!!
LikeLike
Great post Stacey. You are helping me revisit and sharpen my thinking about minilessons. I’m excited to share the posts from this blog series with our teachers at school.
LikeLike
This is helpful, thank you!
LikeLike
Thank you for making this format general enough to be relevant for all age groups!
LikeLike
Minilessons will definitely be a focus for me this year.
LikeLike
This is a great post on real life applications of mini lessons. I appreciate the minilesson planning sheet and plan to use it with teachers during CPT. Thank you!
LikeLike